If you’re using Outlook—whether it’s the Outlook Windows app, Outlook Web App, or the classic Outlook on your desktop—you’ve likely noticed your inbox and other folders gradually filling up with emails. Over time, some of these messages become out-of-date or irrelevant. Managing these older emails manually can be both tedious and time-consuming, especially if you want to clean up your inbox without losing important communications. This is where Outlook’s built-in features for automatically deleting emails can save the day. And beyond email, decluttering your devices can also make a big difference — check out our guide on How to Delete Hidden Apps on iPhone and Android for practical tips.
With the right setup, you can configure Outlook to empty folders, delete emails older than a specific date, or permanently remove messages from your deleted items folder—all with just a few clicks. In this step-by-step guide, you’ll learn how to make use of Outlook’s auto-archive, rules, and advanced settings to keep your email account organized, your message list manageable, and your digital workspace efficient. This will free you up to focus on what truly matters.
If you want to take your inbox organization even further, a smart next step is clearing out unwanted spam and newsletters. With tools like Cleanfox, you can do this effortlessly—and completely free. It helps you identify and unsubscribe from senders you no longer need, reducing future clutter and making your inbox easier to manage.
Understanding Outlook’s Auto-Archive Feature
What is Auto-Archive?
If your Outlook inbox is overflowing with older messages that you want to keep but don’t need at your fingertips every day, the Auto-Archive feature is designed specifically for you. Available in the classic Outlook Windows app, Auto-Archive helps you automatically move emails and other Outlook items that are older than a set period—say, 6 months or a year—from your main folders to a separate archive location. This process not only frees up space in your inbox and other folders but also keeps your digital workspace clean and manageable—without losing access to your older emails.
You can choose to archive items, delete them permanently, or do both—it’s all up to your preference and organizational needs. However, it’s important to note that archived items are stored in a local Outlook Data File (.pst), which means they’re not accessible from other devices or the Outlook Web App. If the file is lost or damaged, your archived emails could be unrecoverable.
Also, if your account is managed by an organization using Exchange Server, Auto-Archive might be restricted by your IT admin or replaced by company retention policies. Always check with your admin if this feature is unavailable in your Outlook.
Setting Up Auto-Archive
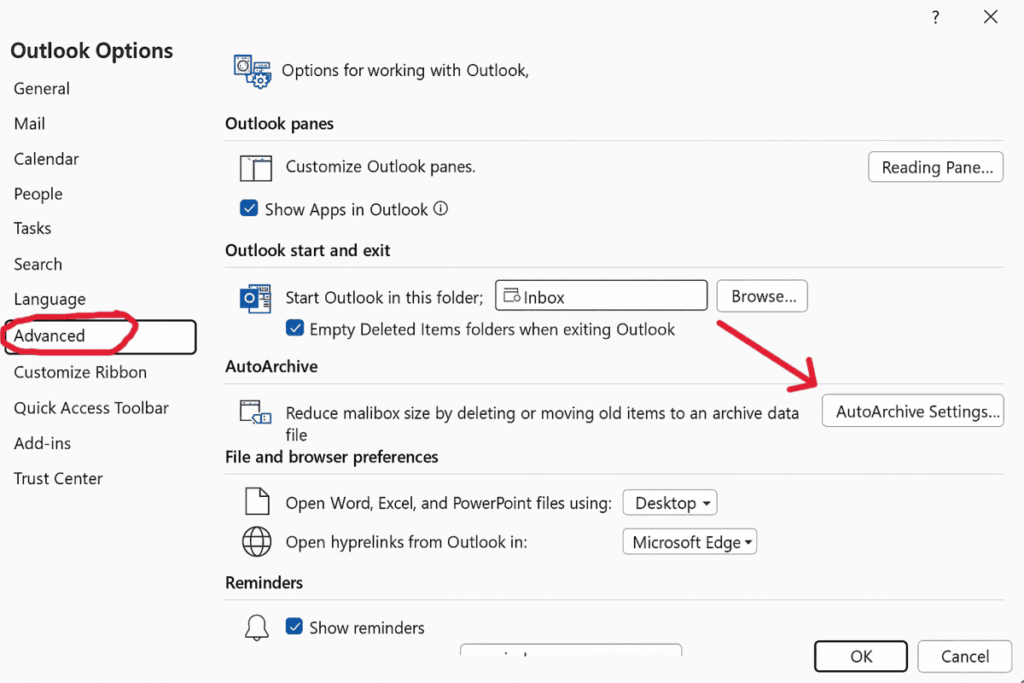
Ready to set up Auto-Archive? Open your classic Outlook desktop client, click File, then Options, and select Advanced. Under AutoArchive, click AutoArchive Settings to bring up the configuration dialog.
Here, you’ll need to check Run AutoArchive every N days to enable the feature.
Next, choose how often Outlook checks your folders and archives old items. Set the number of days an item must be to qualify for archiving. Decide what to do with outdated emails: archive, delete, or both.
You can also customize AutoArchive settings for specific folders. Right-click a folder, select Properties, then go to the AutoArchive tab. There, you can adjust rules for folders that need stricter or more relaxed control.
As you fine-tune these settings, consider whether you want deleted items to be emptied automatically or not, and whether you want to keep your archive folder visible in your folder list for easy access. Once configured, Outlook will run Auto-Archive on schedule, quietly cleaning your inbox and other folders without cluttering your workday.
Creating Rules to Automatically Delete Emails
Accessing Rules in Outlook
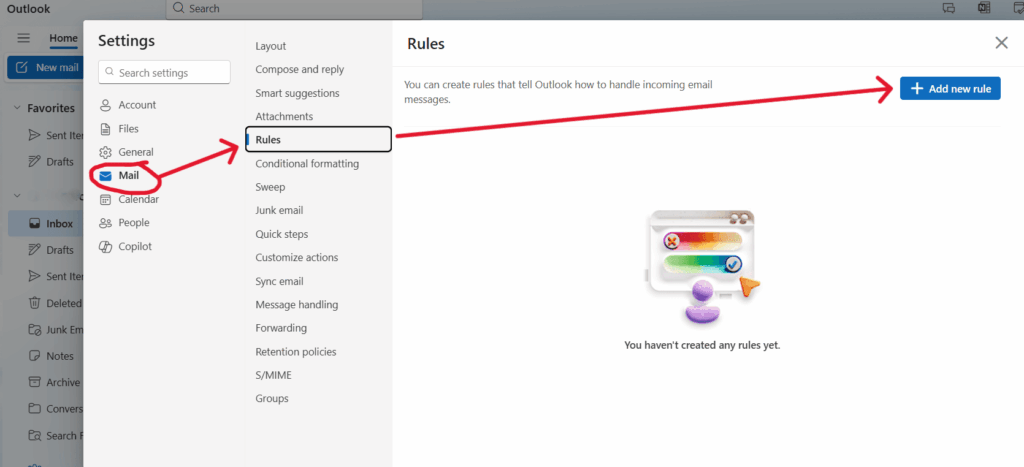
To start automatically deleting emails using rules in Outlook, you’ll first need to access the rules feature. Whether you’re using the desktop app, Outlook Web App, or classic Outlook, this feature allows you to customize how incoming messages are handled based on specific criteria. In Outlook Web, you can typically find rules by clicking on your profile icon or the settings gear, selecting “View all Outlook settings”, and navigating to Mail > Rules.
In the desktop app, head to the File tab and choose Manage Rules & Alerts. This centralized location is where you can create and manage all your rules to automatically clean up your inbox or other folders.
How to Create a Rule for Deletion
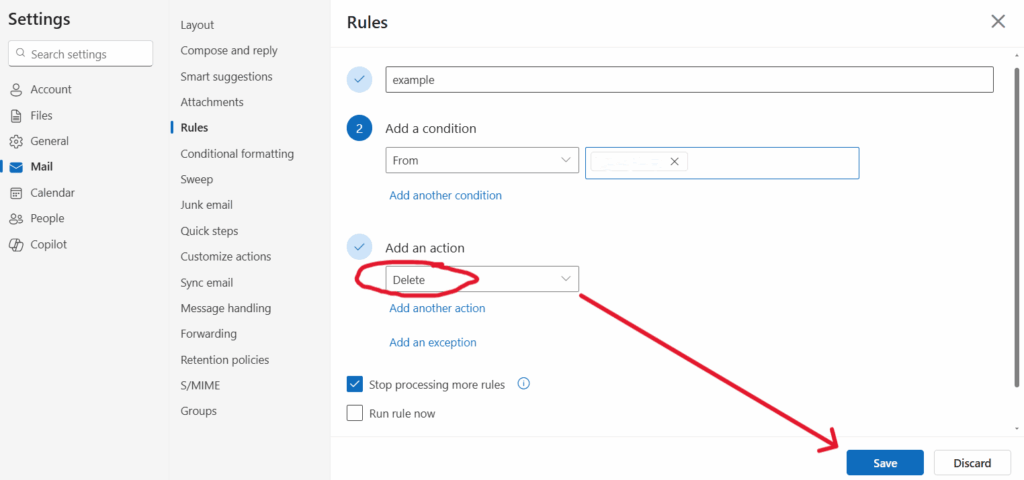
Once you’re in the rules section, you can start creating a new rule. For instance, in Outlook Web App, you might right-click on an email from a sender whose messages you want to delete automatically, select Create Rule, and set a condition such as “from this sender.” Then, under the actions section, choose Delete or move the email to the Deleted Items folder. Additionally, you can set conditions based on keywords, subject lines, or the age of the messages to target older emails specifically.
In classic Outlook or the desktop client, creating a rule involves specifying criteria (e.g., messages older than a certain date or from specific senders) and then setting the rule to automatically delete those messages or move them to the Deleted Items folder as they arrive. This method is perfect for mass deleting emails or keeping your inbox tidy without manually selecting and deleting messages.
Testing and Adjusting Rules
After creating your rule, it’s essential to test it to ensure it performs as expected. Send test messages to yourself or move emails into the folder to check whether Outlook automatically deletes or moves them as intended. You can always return to Manage Rules & Alerts or the Rules settings in Outlook Web to modify your rule’s conditions or actions if the deletion is too aggressive or not broad enough.
If you notice that certain important emails are being deleted unintentionally, consider adding exceptions or refining your criteria to safeguard against losing messages you want to keep. Regularly reviewing your active rules ensures your Outlook mail folders remain optimized and that your auto-delete setup works smoothly, especially when managing mass email deletions or cleaning up emails older than a specific timeframe.
Advanced Settings and Considerations
Say goodbye to spam, clutter, and chaos.
Our smart email cleaner filters out junk, organizes your inbox, and helps you focus on what really matters.
✅ Block spam automatically
✅ Organize emails by priority
✅ Keep your inbox clean
✅ Clean old emails you don’t read
📱 Available on the App Store and Google Play.
Dealing with Exceptions
When setting up automatic deletion in Outlook, it’s essential to handle exceptions carefully to avoid accidentally losing important emails. Outlook rules exempt certain messages from deletion when they meet specified conditions. For example, if you have a rule that deletes emails older than a certain date or from specific senders, you can add exceptions based on keywords, subjects, or sender domains to ensure important communications are preserved.
This flexibility helps you strike the perfect balance between cleaning your inbox and safeguarding essential messages.
Moreover, if your Outlook account is subject to organizational policies or retention labels—especially in Exchange environments—some emails may be protected from deletion, and you might see error messages when trying to delete them. In such cases, check with your Exchange admin or review policy settings to understand which items are exempt and how to manage retention properly.
Combining Filters and Conditions
Create an efficient email management system by combining filters and conditions in one rule. For example, target emails older than 6 months from specific senders or with certain keywords. Then, move them to Deleted Items or delete them permanently.
Using combined conditions helps you avoid broad deletions that could remove more messages than intended, while still enabling mass cleanups of your inbox or specific folders. You can also layer rules by priority, allowing Outlook to process some criteria before others, giving you precise control over how your email is filtered, archived, or deleted. Testing these rules after setup is essential to ensure the filters work as expected without deleting valuable messages.
Conclusion 💡
To keep your Outlook account clutter-free, leveraging features like Auto-Archive and creating rules for automatic deletion is essential. These tools allow you to efficiently manage emails older than a certain date, saving you time and effort compared to manually deleting messages.
Customize exceptions and combine filters carefully to protect important emails while keeping your inbox organized. Set up automated processes to tidy your Outlook folders and keep critical emails easily accessible.
Take action today by exploring these settings in your Outlook app or web account, and enjoy a cleaner, more efficient email experience.
FAQ 🔍
How do I delete emails older than 2 years in Outlook?
To delete emails older than 2 years in Outlook on Windows, right-click your email folder and select Properties. Then, go to the AutoArchive tab. Enable “Archive this folder using this setting.” Set “Clean out items older than” to 730 days (2 years). Choose “Permanently delete old items,” and save. Repeat this process for other folders.
In Outlook on the web, go to Settings and open the Rules section. There, create a rule that deletes emails older than 2 years automatically.
How do I delete thousands of emails in Outlook?
To delete thousands of emails in Outlook, open your Inbox or the desired folder, then press Ctrl + A to select all emails. Alternatively, use the search bar to filter specific emails and then press Delete. You can also use the Clean Up tool in desktop Outlook under the Home tab to remove redundant emails.
For bulk deletion, third-party apps like Edison Mail or Clean Email can be helpful. Additionally, you can group emails by date, sender, or size via the View tab for more targeted deletion.
How do I mass delete emails in Outlook by date?
To mass delete emails in Outlook by date, follow these steps:
- Filter by Date: Use the search bar to filter emails by date.
- Select Emails: Check the box above the email list to select all, and deselect any emails you wish to keep.
- Delete: Press the Delete key or click the trash icon.
How do I clean out old emails in Outlook?
To clean out old emails in Outlook, use the AutoArchive feature via File > Options > Advanced > AutoArchive Settings. Archive or delete emails based on their age and the frequency you set.
You can also create custom Search Folders to find and delete old emails or use the “Clean Up Folder” feature to remove duplicates and old messages in bulk. For emails older than a specific date, apply a rule or filter by date within the folder and delete the selected emails.
Found this guide helpful? Take your email management even further with our post: “How to Filter Emails in Outlook (Step-by-Step Guide for 2025).”
Explore our blog for more actionable tips to keep your inbox under control!


