Managing your Outlook inbox efficiently is essential in today’s busy digital world, where countless emails flood your account daily. If you’ve ever felt overwhelmed by a cluttered inbox, you’re not alone.
Learning how to organize emails in Outlook can transform your workflow, helping you find important messages quickly and maintain control over your communications. By using Outlook’s built-in tools—such as creating folders, setting up rules, assigning categories, and leveraging quick steps—you can organize emails based on senders, subjects, or priority without much effort.
Whether you use Outlook web or Microsoft Outlook on Windows, mastering these techniques will streamline your inbox, reduce distractions, and boost your productivity every day.
If you’ve ever sent an email too quickly or wished you could take back a message, here’s how to unsend a message in Outlook (Recall or Undo Send) — a simple guide that shows exactly how to reverse an email before it reaches the recipient.
And if you’re planning to switch platforms or merge accounts while keeping your messages organized, here’s how to transfer emails from Outlook to Gmail in 2025. This quick tutorial walks you through each step safely and efficiently.
One great way to organize your emails is by cleaning up your spam. And if you want to do it for free, you can use our platform, Cleanfox.
1. Creating Rules for Automatic Sorting
Set Up Rules
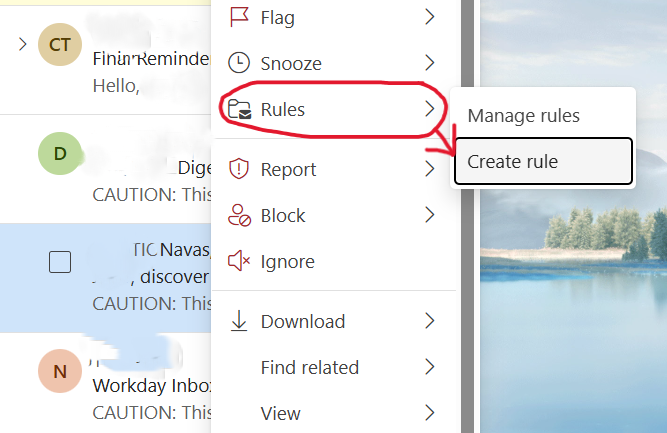
One of the best ways to organize emails in Outlook is by creating rules that automatically sort your incoming messages based on criteria you choose. To set up a rule, start by selecting an email that matches the type of messages you want to organize. Then, click the “…” menu in the message options and choose “Create rule.” From here, you can select conditions such as the sender, specific words in the subject line, or other parameters.
Next, decide what action Outlook should take, for example, moving emails to a designated folder that you can select or create on the spot. Once you’ve configured the rule, save it and choose whether you want it to run immediately on your existing inbox messages.
These steps work both in Outlook web and Microsoft Outlook Windows versions, making it easy to streamline your inbox no matter the platform.
Step. 1 👇
Step. 2 👇

Manage Existing Rules
After setting up rules, managing them ensures your inbox stays organized as your priorities evolve. You can access your existing rules by going to the Outlook settings menu and selecting “Rules” or “Manage Rules & Alerts.” Here, you can edit, delete, or reorder rules to fine-tune how incoming messages are processed.
For example, if you want to prioritize emails from a specific sender or apply different processing rules based on categories, you just need to update the conditions or actions for each rule accordingly. Additionally, you have the option to apply rules across multiple email accounts linked to Outlook and decide if rules apply to incoming or already received messages. Regularly reviewing and adjusting your inbox rules is key to maintaining a clutter-free Outlook email experience.
2. Utilizing Folders and Categories
Create Custom Folders
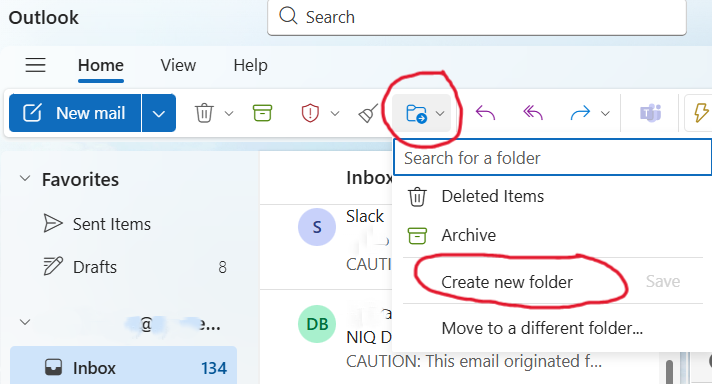
Organizing emails in Outlook becomes much simpler when you create custom folders. To add a new folder, simply right-click on your Inbox or any existing folder and select “New Folder.” Name your folder descriptively, press Enter, and it will instantly appear in your folder list.
For more detailed organization, you can also create subfolders within your main folders. Just right-click on the parent folder and choose “Create New Subfolder.” Whether you’re using Outlook on the web or the desktop version, these steps allow you to organize messages by project, client, or priority. This makes navigating your inbox much more efficient.
Applying Categories
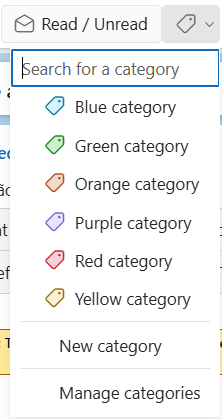
Categories in Outlook offer a visually effective way to organize your emails. You can assign color-coded categories to messages, making it easier to quickly identify projects, follow-ups, or urgent items. To add a category, select a message, click the Categorize button, and choose a predefined color or create a new category with a custom name.
This feature is especially helpful if you receive a high volume of emails from specific senders or about recurring topics. By combining the use of folders and categories, you gain even greater control over how you manage and prioritize your Outlook inbox.
3. Advanced Email Handling Techniques
Use Sweep Feature
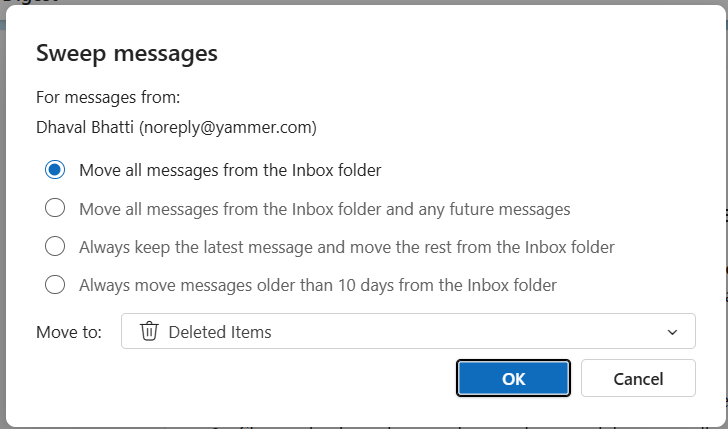
The Outlook Sweep feature is a powerful tool designed to help you manage large volumes of emails quickly and efficiently. Instead of sorting messages one by one, Sweep allows you to bulk move or delete emails from specific senders or based on their age.
For example, you can choose to keep only the latest message from a sender while automatically moving older emails to a folder of your choice, or delete all emails older than a certain number of days. To use Sweep, simply select an email, click the “Sweep” button from the Outlook toolbar, and pick the action that best fits your organizational needs. This feature runs automatically every 24 hours to keep your inbox clean and manageable without constant manual effort.
Step. 1 👇

Step. 2 👇
Flag Emails for Follow-Up
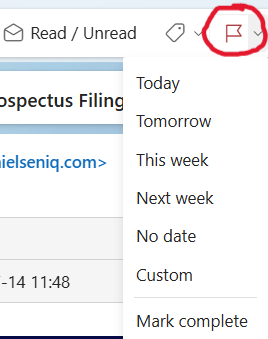
Flagging emails is another advanced method to organize your Outlook inbox effectively. When you flag a message, it gets marked for follow-up, turning it into a visible reminder that demands your attention. You can add due dates and categorize flagged emails to prioritize responses or tasks related to specific projects.
This not only helps in tracking important emails but also integrates with Outlook’s task management features, turning your inbox into a more actionable workspace. Using flags on emails from specific senders or about key topics ensures you never overlook critical messages while keeping your inbox tidy.
Clean Up Tool
Outlook’s Clean Up tool is designed to reduce clutter by removing redundant messages in email conversations. When you use this feature, Outlook deletes duplicate emails that are fully contained within later replies, leaving only the most recent and relevant messages in the thread. This significantly reduces inbox size and makes reviewing conversations much easier.
You can apply Clean Up to individual folders or entire mailboxes, and it works silently in the background while preserving important information. Combining Clean Up with folders and rules can further optimize how you organize emails in Outlook. Cleanfox is another tool you can use to clean all your spam for free — and it only takes a few swipes. Give it a try below. 👇
Say goodbye to spam, clutter, and chaos.
Our smart email cleaner filters out junk, organizes your inbox, and helps you focus on what really matters.
✅ Block spam automatically
✅ Organize emails by priority
✅ Keep your inbox clean
✅ Clean old emails you don’t read
📱 Available on the App Store and Google Play.
4. Additional Features to Boost Email Efficiency
Search Folders
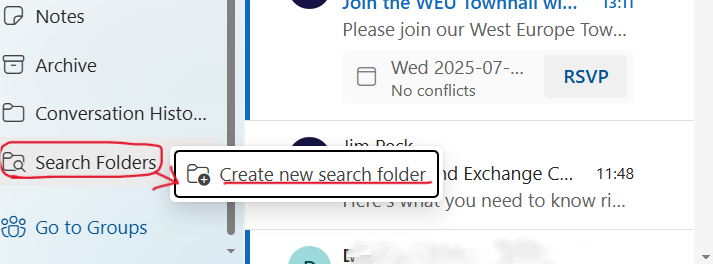
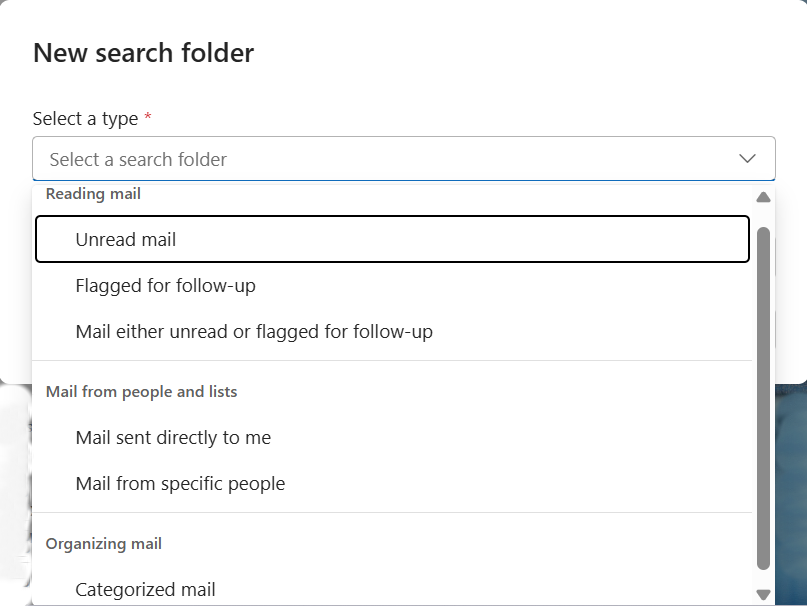
Search Folders are a unique Outlook feature that acts as virtual folders, offering a dynamic view of all emails matching specific search criteria across your entire mailbox. Rather than physically moving emails, these folders collect and display messages based on conditions like unread status, flagged messages, or emails from particular senders.
To create a Search Folder, simply right-click on “Search Folders” in your folder list, select “New Search Folder,” and choose from predefined options or customize your own. This feature allows you to quickly access important emails no matter where they are stored in your mailbox. For even faster access, you can add these Search Folders to your favorites, enhancing email organization without cluttering your folder hierarchy.
Step. 1 👇
Step. 2 👇
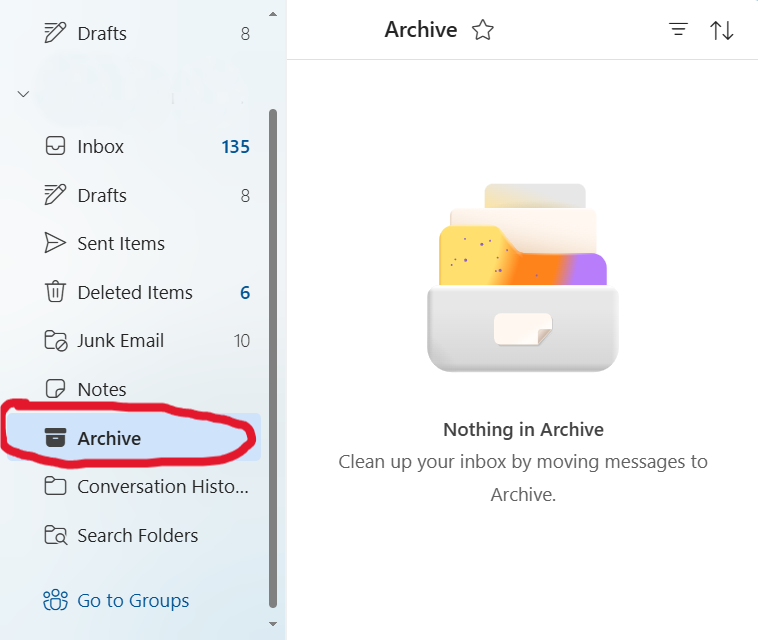
Archiving Emails
Archiving is an efficient way to keep your inbox manageable by moving older or less frequently accessed emails out of your primary mailbox. Outlook’s archiving feature lets you store emails in an archive folder, where they remain easily searchable but don’t crowd your inbox.
You can set up automatic archiving schedules or manually archive specific messages or folders. This not only improves Outlook’s performance but also helps you maintain a clean workspace while preserving important history for future reference. Archiving is particularly useful for emails you want to keep but don’t need to see every day, such as completed projects or older correspondence.
5. Email Templates
If you frequently send similar messages, creating email templates can save you significant time. Outlook allows you to design and store reusable templates, which you can quickly select when composing a new message. This is especially helpful for standard replies, status updates, or common requests.
Using templates ensures consistency and speeds up your email processing, enabling you to focus on higher-priority tasks. You can manage your templates within Outlook and even customize them by adding placeholders to personalize each email before sending.
Conclusion 💡
To effectively organize your Outlook inbox, start by creating rules that automatically sort incoming emails, saving you time and effort. Utilize custom folders and categories to visually group messages for easier access. Advanced tools like the Sweep feature, flagging for follow-up, and the Clean Up tool help maintain a clutter-free inbox.
Don’t forget to explore features like Search Folders, archiving, and email templates to boost your email efficiency. By consistently applying these strategies, you’ll transform your Outlook experience, stay on top of important messages, and reclaim control over your email workflow. Take action today and watch your productivity soar.
FAQ 📘❓
How can I create and manage folders and subfolders effectively in Outlook to organize my emails?
To effectively create and manage folders and subfolders in Outlook, start by right-clicking on your inbox or an existing folder to create new folders. Use subfolders to nest related topics for better organization. Then, implement rules to automatically sort emails into these folders for efficient management.
What are the best practices for using categories and labels to prioritize and sort emails in Outlook?
Best practices for using categories and labels in Outlook include:
- Create clear, limited categories based on priority or timing (e.g., “urgent,” “same-day”).
- Use rules to automatically assign categories by sender, subject, or keywords.
- Arrange your inbox by category with numbered names to prioritize.
- Apply and remove categories via the toolbar or right-click menu efficiently.
These steps optimize email sorting, prioritization, and productivity.
How do Outlook’s rules and automation features help in organizing and managing incoming emails?
Outlook’s rules and automation features help organize incoming emails by:
- Automatically moving messages based on sender, subject, or content to specific folders.
- Flagging or categorizing emails for quick identification.
- Deleting or archiving messages after set periods.
- Forwarding emails and sending automatic replies during defined times.
This automation reduces manual sorting, enhances productivity, and maintains a tidy inbox.
What strategies can I use to keep my Outlook inbox clutter-free and ensure important emails stand out? 🚀
Use these strategies to keep your Outlook inbox clutter-free and highlight important emails:
- Create folders like “To do,” “Follow up,” and “Later” to sort by priority. ✅
- Set rules to automatically move or filter emails based on sender or content. ✅
- Use categories and flags to mark urgent messages. ✅
- Use Sweep to bulk-manage emails. ✅
- Pin important emails to keep them visible. ✅
These methods ensure a clutter-free inbox and make important emails stand out.
If you liked this article and want to learn more about email productivity, check out our post: “How Can I Improve the Clarity of My Email?” and explore our blog for more helpful content.


