
Adding a folder in Outlook is a fundamental way to organize your email, contacts, and other information efficiently across the Microsoft Outlook platform. Whether you are using the desktop app on Windows or Mac, the Outlook web app, or the Outlook mobile app, knowing how to create folders and subfolders will help you keep your inbox structured and manageable. This guide will walk you through the simple steps to create folders in each version of Outlook, allowing you to group emails, contacts, or messages in folders that suit your workflow — as well as utilize helpful features like rules and contact groups.
By the end of this tutorial, you will be able to add new folders, create top-level folders, and subfolders, enhancing your Outlook experience on any device. And if you’re looking to take your Outlook organization even further by cleaning up unwanted emails, you can try Cleanfox — a 100% free tool that helps you declutter your inbox in just a few clicks.
And if you’re planning to move your messages or switch to another platform, here’s how to transfer emails from Outlook to Gmail in 2025. It’s a simple step-by-step guide to help you migrate your inbox safely and efficiently.
Adding a Folder in Outlook Desktop
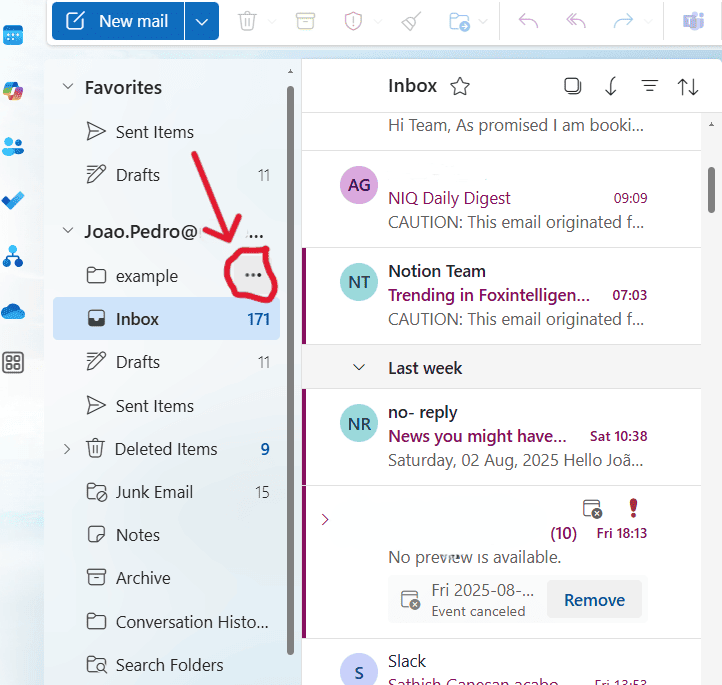
Creating a Top-Level Folder
To add a top-level folder in Outlook desktop, start by navigating to the folder pane located on the left side of your Outlook window. Right-click on your email account name or the area where your current folders are displayed, then select Create New Folder.
When prompted, type the desired name for your new folder and press Enter. This folder will now appear alongside your existing inbox and other main folders, making it easier to organize your emails, contacts, or messages at the top level of your folder structure. The process is consistent across both Outlook for Windows and Outlook Mac, ensuring a seamless experience for managing folders on desktop platforms.

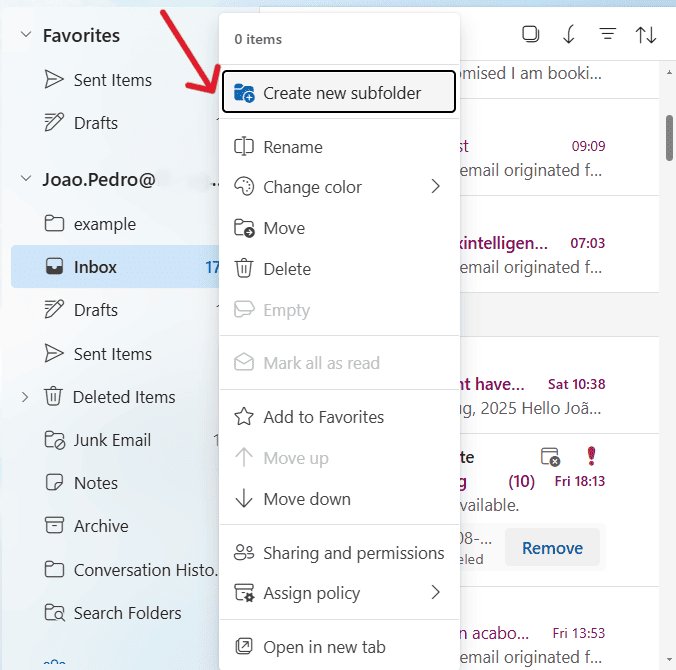
Creating a Subfolder
Adding a subfolder is equally simple and provides a great way to group related emails within a larger folder. In Outlook desktop, locate the parent folder where you want the subfolder to reside. Right-click on that folder and select Create New Subfolder from the context menu.
Type the name of your new subfolder and press Enter. The subfolder will appear nested under the chosen parent folder, allowing you to better manage and organize your inbox or contacts. For added flexibility, you can create multiple levels of subfolders, which is particularly useful for handling complex projects or maintaining a detailed organizational system.
Step. 1 👇
Step. 2 👇
Adding a Folder in Outlook on the Web

Say goodbye to spam, clutter, and chaos.
Our smart email cleaner filters out junk, organizes your inbox, and helps you focus on what really matters.
✅ Block spam automatically
✅ Organize emails by priority
✅ Keep your inbox clean
✅ Clean old emails you don’t read
📱 Available on the App Store and Google Play.

Creating a Top-Level Folder
To create a top-level folder in Outlook on the web, locate the folder pane, which is typically found on the left side of the screen. Right-click on Folders or hover over it and select More options > Create new folder.
Next, type the name you want for your new folder and press Enter. The new folder will appear as a main folder just below your inbox, enabling you to efficiently organize and separate your emails or contacts without nesting it inside another folder. This process is simple and works consistently whether you’re using Outlook.com or the Outlook Web App.
Creating a Subfolder
For more detailed organization, you can create a subfolder within an existing folder in Outlook on the web. Choose the folder where you want the subfolder to reside, right-click it (or hover to activate the menu), and select More options > Create new subfolder. After entering the name for the subfolder, press Enter. The subfolder will then appear nested under the parent folder.
This method is ideal for sorting emails or contacts by specific projects, categories, or topics, helping you maintain a tidy and easily navigable mailbox.
Adding a Folder in Outlook Mobile App
Creating a Folder on Android and iOS
Creating a new folder directly within the Outlook mobile app on Android and iOS can be a bit tricky, as the app does not offer a straightforward “Create Folder” option. However, you can still create folders by using the move function on an email. Start by pressing and holding an email message to select it.
Next, tap the Move to folder icon, which is usually located at the bottom center of the screen. In the folder selection menu, look for an option like a plus sign (+) or “Create new folder.” Enter the folder name and tap Create.
Once created, your new folder will appear, and the selected email will be moved into it. You can easily view and access this folder anytime by tapping your profile icon or navigating to the menu where all folders are listed.
If you find this method limiting or if the option to create a folder is unavailable, a useful workaround is to log into Outlook through a web browser on your mobile device. Request the desktop site and create the folder there. Alternatively, you can create folders using the Outlook desktop or web app. These folders will automatically sync to your mobile app, ensuring they are accessible wherever you go.
Conclusion 🎯
Remember, adding folders in Outlook across desktop, web, and mobile platforms is key to keeping your email, contacts, and messages organized and easy to navigate. Whether you create a top-level folder or a subfolder, this simple step can significantly boost your productivity and help you manage your inbox more effectively.
Take advantage of the folder features in your preferred Outlook version and start customizing your workspace today. By organizing smartly, you’ll spend less time searching and more time focusing on what truly matters.
So go ahead—create your folders and transform your Outlook experience now.
FAQ💡
How do I add a new folder to my Outlook?
To add a new folder in Outlook, right-click your mailbox name or Inbox in the folder pane and select “Create new folder.” Type the folder name and press Enter. For a subfolder, right-click an existing folder and choose “Create new subfolder.” On Outlook web, use the “New folder” option located at the bottom of the folder list.
How do I add existing folders to Outlook?
To add existing folders to Outlook, right-click your email address or mailbox name in the folder pane, then select “Create new folder” to add a top-level folder. To add a subfolder, right-click an existing folder and choose “Create new subfolder.” Name the folder and press Enter to confirm.
How to make a new folder in Outlook on iPhone?
To create a new folder in Outlook on iPhone, open the app and select an email. Tap the three dots at the top right, then choose “Move to folder.” Tap the folder icon at the top right of the next screen, enter a folder name, and tap “Create” to finalize.
How to create a new folder?
To create a new folder, open File Explorer and navigate to your desired location. Right-click in the empty space or click the “New” menu, then select “Folder.” Name the folder and press Enter. Alternatively, use the shortcut Ctrl + Shift + N or create a folder via command line with mkdir.
Did you enjoy reading this article? If you’d like to master your email even more, check out our guide: How to Delete Old Emails in Outlook Automatically (2025). Visit our blog for more valuable tips.