If you’re looking to seamlessly manage your incoming messages, learning how to auto forward emails in Outlook is an essential skill. Whether you want your emails from one account to be automatically forwarded to another, or you need to ensure important messages reach a team inbox, setting up forwarding rules in Outlook can save you time and keep your communications organized. This step-by-step guide will walk you through the process of creating automatic forwarding rules in various versions of Outlook — including the latest Outlook 365, classic Outlook desktop, and Outlook Web App (OWA).
By the end, you’ll know exactly how to configure Outlook to forward emails automatically, so you never miss a message and can maintain smooth email workflows.
And if you’re tired of dealing with spam, you can use Cleanfox to clean your inbox in just a few clicks—completely free. It’s the perfect companion after learning how to auto forward emails in Outlook, helping you stay organized and focused.
Setting Up Auto Forwarding in Outlook 365 (New Outlook)
Accessing the Rules Menu
To begin auto forwarding emails in the new Outlook 365, you first need to access the rules menu, which allows you to create custom processing rules for incoming messages. Start by opening Outlook and selecting Settings (the gear icon) at the top right. Then, click on View all Outlook settings at the bottom of the settings pane.
Navigate to Mail, then select Rules from the submenu. This is where you can manage forwarding rules, create new ones, or edit existing rules to automate your email forwarding process.

Creating a New Rule for Forwarding
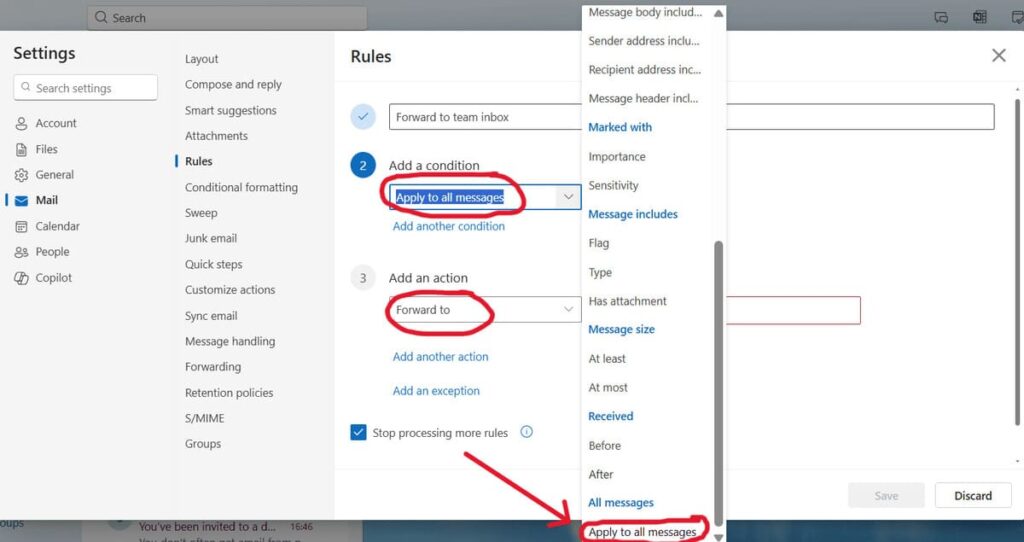
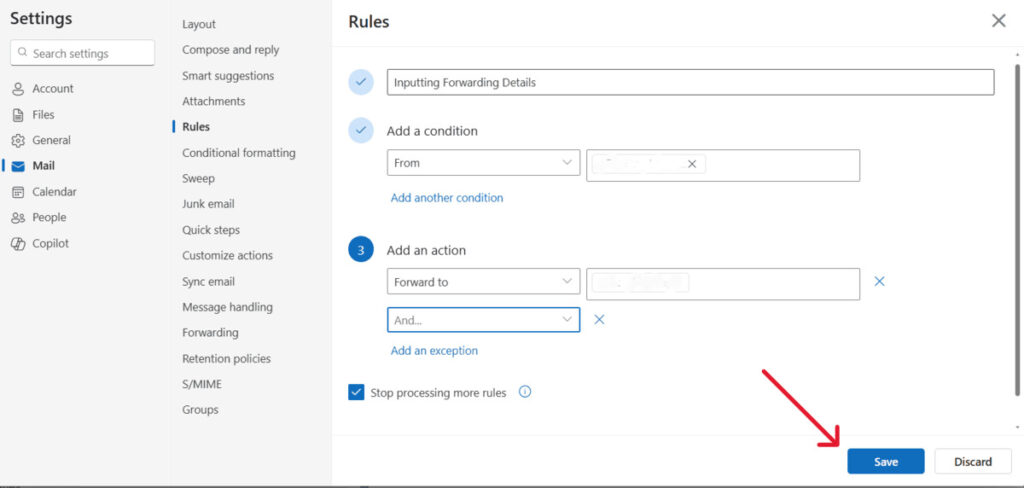
Once you’re in the Rules menu, click on Add new rule to start setting up a forwarding rule. You’ll want to give your rule a clear name, such as “Forward to team inbox” or “Auto Forward to personal account,” so you can easily identify it later.
Under the conditions section, you can define which messages this rule applies to — for instance, all emails or only those from specific senders or with certain keywords. If you want all incoming emails to be forwarded, leave the conditions blank or select “Apply to all messages.”
Defining Forwarding Settings
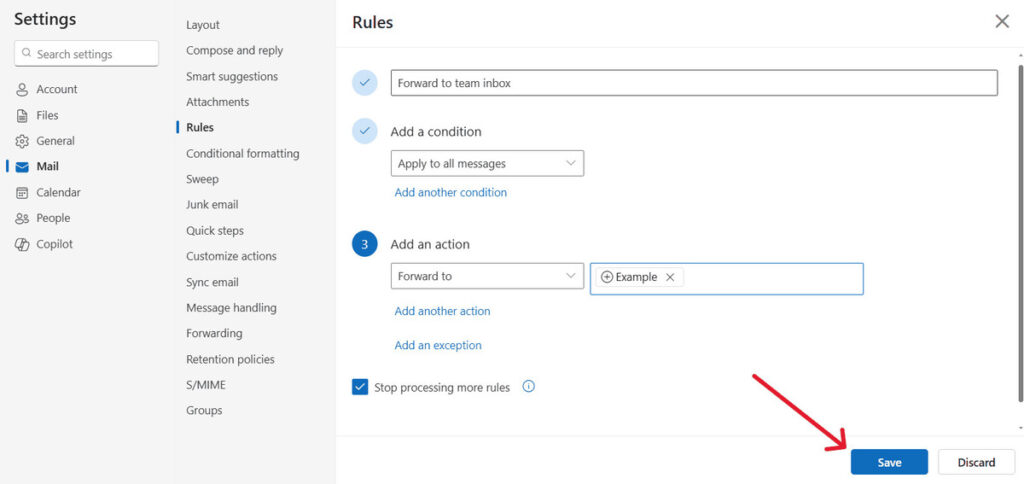
Next, specify the action for your forwarding rule by choosing Forward to or Redirect to and enter the email address where you want the messages to be sent. If you want to keep a copy of forwarded emails in your Outlook inbox, make sure to adjust the settings accordingly.
After entering the forwarding address, click Save to activate the rule. Now, all emails that meet your defined criteria will be automatically forwarded to the designated address, streamlining your workflow and ensuring critical messages never get missed.
And if you’re exploring other advanced ways to use email beyond forwarding, check out our guide on How to Send a Fax Using Email for another practical example.
Enabling Auto Forwarding in Classic Outlook
Finding the Rules Section
In classic Outlook, setting up auto forwarding begins by accessing the rules section. Start by clicking on the File tab located in the top-left corner of the Outlook window.
Next, choose Manage Rules & Alerts from the menu options. If you have multiple email accounts configured in Outlook, ensure you select the correct account under the “Apply changes to this folder” dropdown, which is near the top of the Rules and Alerts dialog box.
This step is essential as it ensures that your forwarding rule applies specifically to the intended inbox.
Configuring a Forwarding Rule
To create a new rule, click the New Rule button. For a simple setup, select Apply rule on messages I receive under the “Start from a blank rule” section, and then click Next.
You can define specific conditions to filter which emails get forwarded, such as messages from certain senders or emails containing particular keywords in the subject line. If your objective is to forward all incoming messages automatically, proceed without selecting any conditions and confirm that you want this rule to apply to every message.

Inputting Forwarding Details
In the actions step, check the box for forward it to people or public group. Then, in the rule description box, click the underlined “people or public group” link to open the Rule Address dialog.
Here, you can enter the email address where you want your messages forwarded. Alternatively, you can select an address from your Global Address List if applicable. Once done, you can add exceptions if necessary. Finally, give your rule a meaningful name to easily identify it later.
Decide whether you want to run the rule on existing messages in your inbox, and then click Finish.
With this setup complete, your classic Outlook will now automatically forward emails according to the rule you’ve configured, ensuring your communications stay seamless and uninterrupted.
Auto Forwarding in Outlook Web App (OWA)
Say goodbye to spam, clutter, and chaos.
Our smart email cleaner filters out junk, organizes your inbox, and helps you focus on what really matters.
✅ Block spam automatically
✅ Organize emails by priority
✅ Keep your inbox clean
✅ Clean old emails you don’t read
📱 Available on the App Store and Google Play.
Navigating to Settings
To set up auto forwarding in Outlook Web App, start by signing into your account using a web browser. You can access it via your organization’s Outlook Web App URL or by going to outlook.office365.com. Once you’re logged in, click the Settings icon (the gear symbol) in the upper-right corner of the screen.
Click the gear icon, then choose View all Outlook settings from the bottom of the dropdown menu. From there, navigate to Mail, and then select Forwarding in the left-hand menu. This pathway allows you to access and configure the forwarding options and rules within the OWA interface.
Establishing Forwarding Preferences
Within the Forwarding settings, you’ll find an option to Enable forwarding. Check this box to activate automatic forwarding for your incoming messages. Then, enter the email address where you want your messages to be forwarded in the provided field.
If you’d like to keep a copy of each forwarded message in your Outlook inbox, make sure to also select the Keep a copy of forwarded messages checkbox. Once your preferences are set, click Save to apply the rule.
This straightforward method ensures your emails are automatically redirected to another email account, helping you stay on top of important communications while maintaining control over your inbox.
Conclusion💡
Setting up auto forwarding in Outlook—whether in Outlook 365, classic Outlook, or the Outlook Web App—can significantly enhance your email management by automatically directing important messages to the appropriate destination. Ensure you carefully create and define your forwarding rules. Input the correct email addresses, and decide whether to keep copies of forwarded emails in your inbox.
By taking these steps, you can guarantee you never miss critical communications while maintaining a well-organized workflow. Now that you understand how to create and manage forwarding rules, take action today to streamline your email experience and stay connected effortlessly.
FAQ📖
Can Outlook forward emails automatically?
Yes, Outlook can automatically forward emails by creating a forwarding rule in the settings. Simply specify the conditions (or leave them blank to forward all emails), enter the forwarding address, and save the rule. This feature works across Outlook desktop, Outlook.com, and Exchange accounts, allowing for seamless redirection of incoming emails.
How do I set up auto forward on my email?
To set up auto-forwarding in your email, log into your email account’s settings. Locate the forwarding section, input the forwarding email address, and confirm it via a verification link sent to that address. Additionally, you can choose whether to keep a copy of the forwarded emails.
Remember to save your changes. The specific steps may vary depending on your email provider, such as Gmail, Outlook, or Yahoo.
How do I get Outlook to automatically go to the next email?
To configure Outlook to automatically go to the next email after deleting or moving the current one, navigate to File > Options > Mail. Under the “Outlook panes” section, find the option labeled “After moving or deleting an open item” and select “Open the next item” from the dropdown menu. Finally, click OK to save your changes.
This setting ensures automatic navigation to the next message for a smoother workflow.
Can you auto forward emails in Outlook to multiple recipients?
Yes, you can auto-forward emails in Outlook to multiple recipients by creating a rule. Within Outlook’s Rules and Alerts, create a new rule for messages you receive. Select the action to forward or redirect the emails to “people or public groups.” This option allows you to input multiple email addresses.
For Microsoft 365, administrators can use the Exchange Admin Center to set up mail flow rules for multi-recipient forwarding, ensuring efficient email distribution.
This was my step-by-step guide on how to auto forward emails in Outlook. If you found it helpful, feel free to check out our blog for more tips and articles to boost your email productivity.


