
If you’ve been looking for “how to block emails in Outlook”, this step-by-step guide is here to help. Learn exactly how to stop unwanted messages from filling up your inbox. We’ll cover steps to block specific senders and domains, redirect spam to your Junk folder, and make the most of Outlook’s blocked senders and junk email settings. By following these tips, you can ensure those pesky emails never make it to your main mailbox again.
This guide focuses specifically on Outlook, but if you’re dealing with spam across multiple email providers, you may also want to check our step-by-step guide on how to block unwanted emails.
If you’re looking for an additional way to reduce spam and unwanted emails in Outlook, you can also use Cleanfox for free. It helps you identify and unsubscribe from unwanted newsletters, giving you a cleaner inbox alongside Outlook’s built-in blocking tools.
Block Unwanted Senders
Video Tutorial ⬇️
Block Senders Directly from Your Inbox
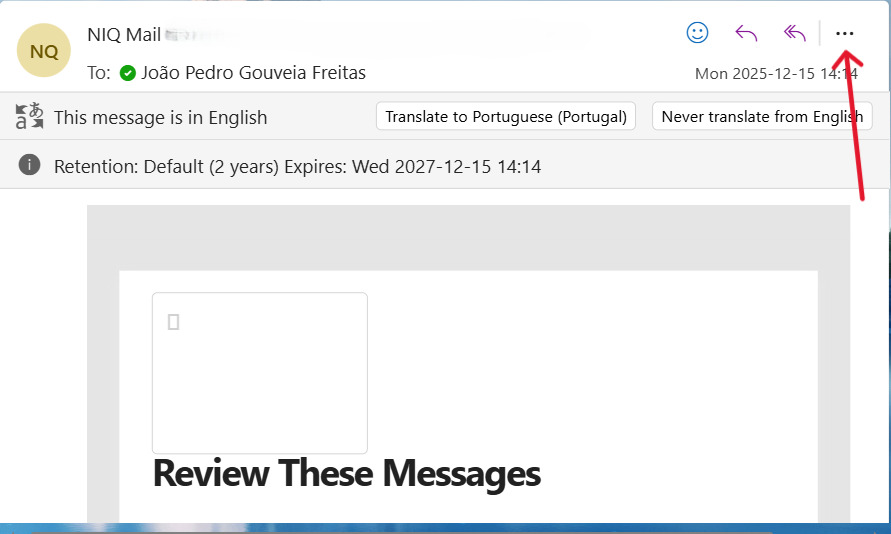
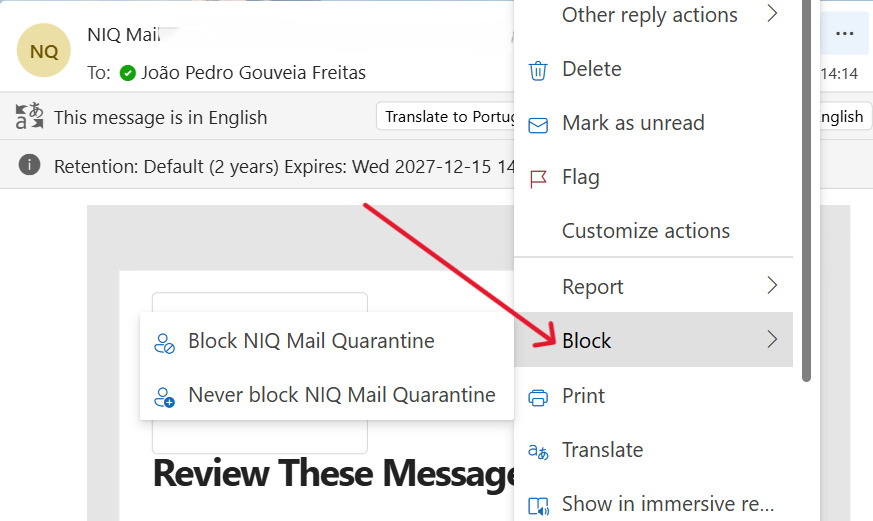
When an unwanted email lands in your inbox, you can block that email address in seconds so future messages go straight to your Junk folder, or may be automatically deleted depending on your Outlook settings. Simply open or select the message, choose the Junk or More/three-dots menu, then click Block or Block Sender to confirm. Outlook will then route that sender’s emails away from your inbox, ensuring they no longer clutter your main mail folder.
If you’re using the Outlook desktop app, you can also right-click a message and select Block > Block Sender. This action immediately adds the email address to your blocked senders list, effectively preventing those specific emails from reaching your inbox.
Step. 1 👇
Step. 2 👇
Manage Your Blocked Senders List
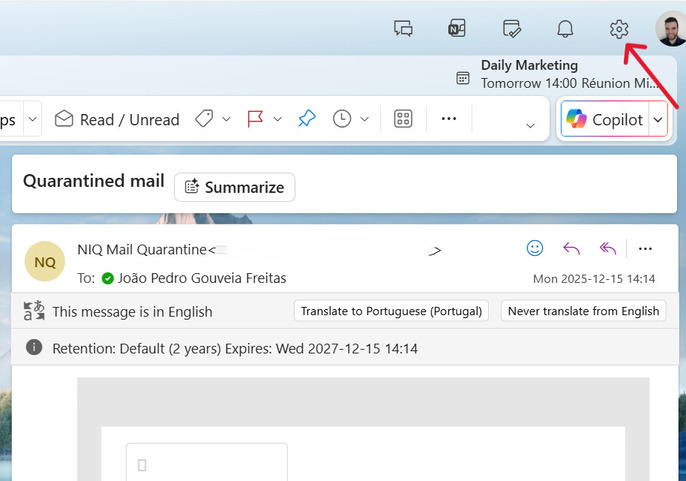
To review or edit who you’ve blocked, open Outlook settings and navigate to Mail > Junk email (or Junk E-mail Options in some desktop versions). Look for the Blocked senders and domains section. Here, you can add email addresses or entire domains, remove entries you no longer want blocked, or bulk-manage multiple blocked senders for efficient inbox control.
Step. 1 👇
Step. 2 👇
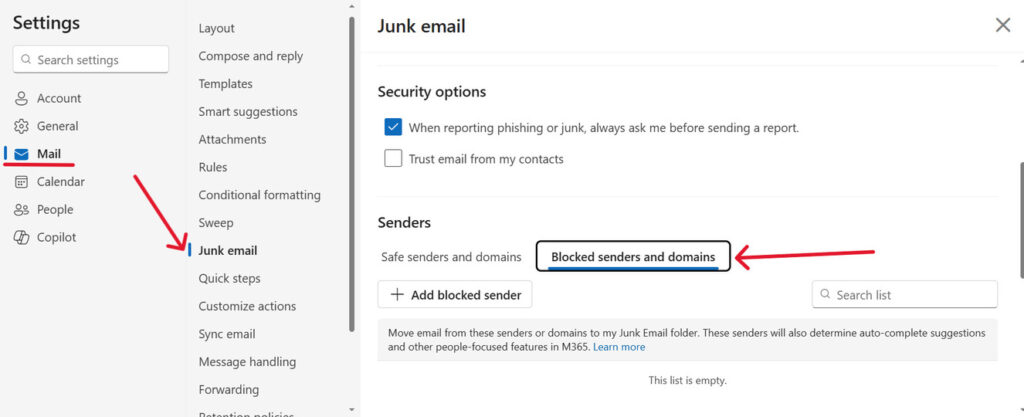
Tip: Adding a sender’s domain (e.g., @example.com) to the blocked senders list will block all emails from that domain. This method is faster than individually adding multiple email addresses, especially when spam originates from the same source.
Filter Spam with Outlook’s Junk Email Options

Say goodbye to spam, clutter, and chaos.
Our smart email cleaner filters out junk, organizes your inbox, and helps you focus on what really matters.
✅ Block spam automatically
✅ Organize emails by priority
✅ Keep your inbox clean
✅ Clean old emails you don’t read
📱 Available on the App Store and Google Play.

If you want more control beyond basic blocking, you can also learn how to filter emails in Outlook using advanced rules and conditions to automatically sort, move, or delete unwanted messages.
Junk Email Folder Settings
Outlook helps keep your inbox clean by routing suspected spam into the Junk Email folder. To make this folder more accessible, you can add it to Favorites or check it regularly to catch any false positives.
In the classic Outlook desktop app for Windows, you can adjust the aggressiveness of the Junk Email filter by navigating to Home > Block > Junk E-mail Options. From there, you can select a protection level such as Low, High, or Safe Lists Only. In the classic Outlook desktop app for Windows, you can also choose to permanently delete suspected spam instead of moving it to the Junk folder.
Advanced Junk Email Options
Within Junk E-mail Options, you’ll find the safelist collection (Safe Senders, Safe Recipients, and Blocked Senders). These lists are used by Outlook and Exchange to determine whether a message should go to your Inbox or the Junk Email folder. If you’re using Exchange or Exchange Online, these lists sync automatically across Outlook and Outlook on the web.
You can block entire top-level domains or add multiple senders and domains to your blocked senders list. Additionally, Outlook and Microsoft Defender automatically flag suspicious or spoofed domains based on security intelligence. In organizational environments, administrators can configure additional warning banners and protections via Microsoft Defender or Exchange policies.
Setting Up Safe Senders and Recipients
Add Trusted Contacts to Safe Lists
Adding trusted email addresses or entire domains to your Safe Senders list ensures that important emails land in your inbox instead of the Junk folder. To do this in Outlook, navigate to Settings > Mail > Junk email. Go to the Safe senders and domains section, select Add safe sender, enter the email address or domain, and save the changes.
You can also mark a message’s sender as safe directly from an email. Simply right-click the message or use the Block menu, then choose Never block sender (or add to Safe Senders). This action immediately prevents that sender’s future messages from being treated as junk, without needing to manually edit lists.
Import and Export Safe Lists
If you manage multiple accounts or want to back up your settings, Outlook and Exchange provide options to move safe senders lists between mailboxes. Administrators can deploy allowlists via Exchange or Microsoft Defender tenant allow/block lists.
Meanwhile, individual users can export and import their Safe Senders entries, or have IT teams push a list through Intune, ensuring the same safe senders and domains are applied across devices. For most users, the simplest approach is to recreate key entries in each account via Settings > Junk email > Safe senders and domains. For organizations, administrators can use Defender or Exchange transport rules to centrally allow entire domains, ensuring emails from these domains skip spam filtering for everyone at once.
Conclusion
Take control of your inbox by blocking unwanted senders directly from your messages. Manage your blocked senders list to include annoying domains, adjust your Junk Email settings for effective filtering, and add trusted contacts to your safe senders list to ensure important emails are protected.
These simple steps—right-click to block a sender, fine-tune Junk Email options (where available), and whitelist key addresses—give you the power to eliminate spam in Outlook on Windows or the web.
For a truly clutter-free inbox, blocking spam is only the first step. You can also delete old emails in Outlook automatically to remove outdated messages and keep your mailbox fast and organized.
Take action today: review your lists, report junk, and enjoy a clutter-free mailbox that delivers only what matters. Your time deserves better than endless spam!
FAQ
How do I block a specific email address or domain in the new Outlook for Windows?
To block a specific email address or domain in the new Outlook for Windows:
- Open the new Outlook for Windows.
- Select a message from the sender you want to block.
- Click the three dots (More actions) and choose Block.
Alternatively, go to Settings > Mail > Junk Email > Block senders and domains, add the email address or domain, and click Save.
What happens to emails from blocked senders in Outlook, and can I recover them?
Emails from blocked senders are typically moved to the Junk Email folder. Depending on your Outlook version, settings, or organizational policies, they may also be automatically deleted. Blocking usually redirects these emails away from your Inbox rather than removing them permanently.
To recover a blocked email:
- Open the Junk Email folder.
- Select the message.
- Choose Not Junk or move it back to your Inbox.
Why can’t I block senders for third-party accounts like Gmail in the new Outlook?
The new Outlook only supports the built-in Block Sender feature for accounts using Exchange or Exchange Online. Third-party IMAP or POP accounts, such as Gmail, do not integrate with Outlook’s server-side blocking and junk filtering rules.
How do I unblock a sender or manage my Junk Email settings in Outlook?
To unblock a sender or manage Junk Email settings:
- Web / New Outlook:
Settings > Mail > Junk Email > Blocked Senders → Remove sender - Classic desktop app:
Home > Junk > Junk Options > Blocked Senders → Remove > OK - Mobile:
Use Outlook on the web to manage these settings.
This concludes our guide on how to block emails in Outlook. If you’d like to learn more about email security and inbox management, explore the rest of our blog.