
If you’re looking to streamline your email communication, learning how to create a Gmail group is one of the most effective ways to send messages to multiple people at once without typing each individual email address. A Gmail group, which can be created through Google Contacts or Google Groups, allows you to organize contacts into a label or group email list. Once set up, you can easily send group emails by simply entering the group name in the message window. This not only saves you time and effort but also ensures your emails reach all intended members simultaneously.
Before creating a group, make sure you already have an inbox. If not, follow this step-by-step guide to create a new Gmail account first.
This step-by-step guide on how to create a gmail group will walk you through the process of creating and managing your own Gmail group. You’ll learn how to effortlessly add members, manage contacts, and send messages to your group anytime you need.
And if you want to keep your inbox organized while managing multiple contacts, you can also use Cleanfox — our free tool that helps you clean up unwanted emails and maintain a clutter-free inbox.
Step 1: Access Google Contacts
Navigating to Google Contacts
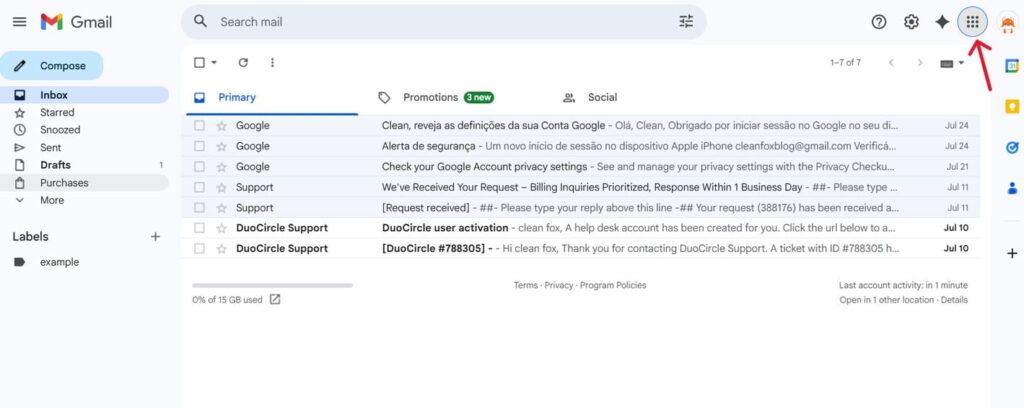
The first step in creating your Gmail group email is to access Google Contacts, the tool where you’ll manage all your contact groups and members. To get started, log into your Gmail account and locate the Google Apps icon—a small square grid found in the upper right corner of your Gmail inbox. Click on this icon to reveal a dropdown menu displaying all the Google applications available to you.
In this menu, select the Contacts icon, typically represented by a silhouette symbol. Clicking on it will open your Google Contacts page in a new window, providing you full access to your contact list and group management tools. Alternatively, if you prefer a quicker method, simply navigate directly to contacts.google.com in your browser to skip the Gmail interface entirely.
Step.1 👇
Step. 2 👇

Whichever method you choose, you’ll arrive at the main Google Contacts console, where you can easily organize your contacts into groups and efficiently manage your contact database.
Step 2: Create and Name Your Group Label
Creating a New Label
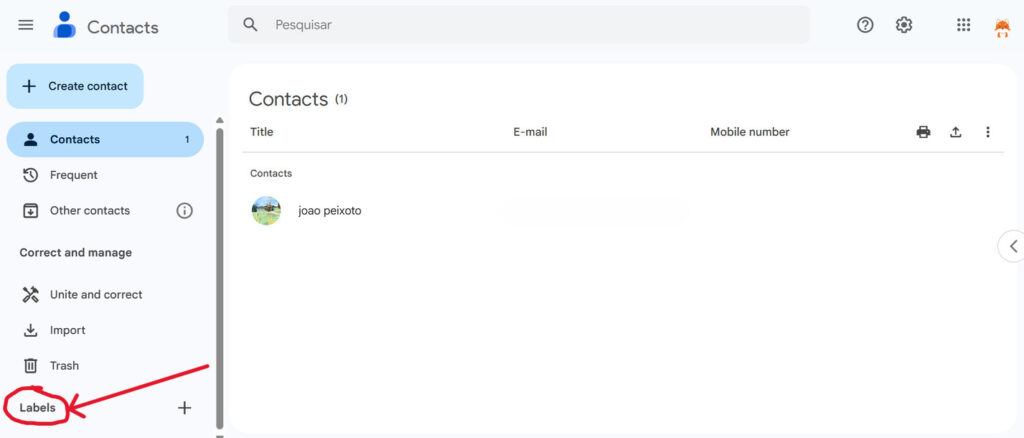
Once you’re in Google Contacts, the next step is to create a new label, which acts as your Gmail group. Locate the “Labels” dropdown menu on the left side of the Google Contacts interface. Scroll down if needed until you see the option to + Create label.
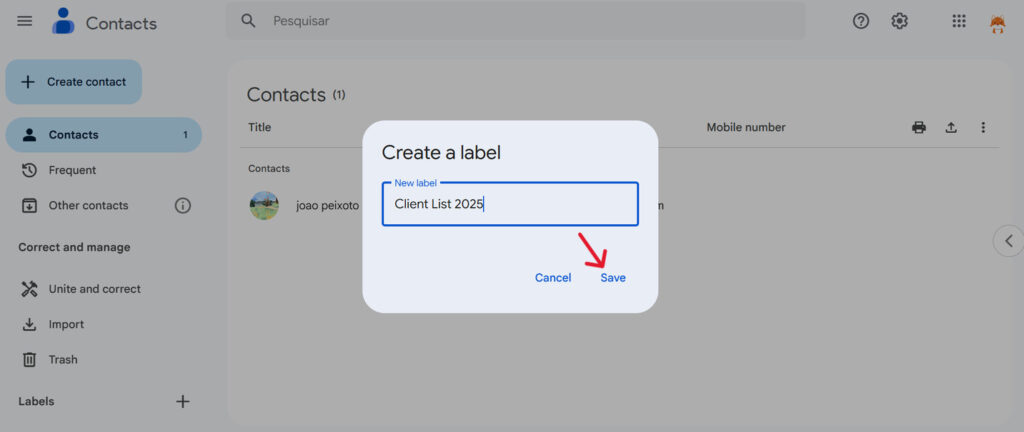
Click this, and a small window will pop up prompting you to enter a name for your new group label. This label will serve as the group email name you’ll use later to send messages easily to all group members. After typing your desired label name—something descriptive like “Work Team” or “Newsletter Recipients”—click Save. Your new group will then appear in the labels list, ready for you to add members.
Step.1 👇
Step. 2 👇
Label Naming Best Practices
Choosing the right name for your group label can make managing multiple groups and sending group emails simpler and more efficient. Keep your label names clear and straightforward, ideally reflecting the purpose or category of the group members, such as “Project Alpha” or “Friends.” Avoid overly long or vague names, as you will be typing or selecting this label when composing emails. Clear group names help you quickly find the right group when sending emails in Gmail, ensuring your communication stays organized and avoids confusion between different groups or contact lists. If you ever need to remove a label, see our step-by-step guide on removing labels from Gmail.
Step 3: Add Contacts to Your Group
Selecting Contacts
After creating your group label, the next step is to add contacts to it. In Google Contacts, start by finding the contacts you want to include in your group email.
You can use the search bar at the top to quickly locate specific people by typing their names or email addresses. Alternatively, you can browse through your entire contact list.

To select contacts, hover over each contact’s name or avatar and click the checkbox that appears to the left of their name. This way, you can easily select multiple contacts at once to add to the group without having to add them one by one.
Assigning Contacts to the Label
Once you have selected the desired contacts, look for the Manage labels icon (which looks like a label or tag) typically found at the top of the contact list. Click on it, and a dropdown menu will appear displaying all your existing group labels.

Say goodbye to spam, clutter, and chaos.
Our smart email cleaner filters out junk, organizes your inbox, and helps you focus on what really matters.
✅ Block spam automatically
✅ Organize emails by priority
✅ Keep your inbox clean
✅ Clean old emails you don’t read
📱 Available on the App Store and Google Play.

Simply choose the label you created for your group, then click Apply. This action assigns the selected contacts to your new group label.
You can also add contacts individually by opening their contact card, clicking on the three-dot menu, and selecting your group label from the list. If you want to add new contacts on the spot, you can create them directly in Google Contacts and assign them to the group during creation.
Verifying Group Creation
To confirm that your Gmail group email is ready, navigate to the Labels section in Google Contacts and click on the group label you created. You should see all the contacts you assigned listed under that label. This confirms that when you start composing an email in Gmail, typing the group label name in the recipient field will automatically populate all the associated email addresses, allowing you to send group emails quickly and efficiently.
This verification step ensures that your message will reach all intended group members without missing anyone.
Conclusion
Creating a Gmail group is a simple yet effective way to streamline your communication and maintain organization. Google Contacts group labels let you effortlessly send messages to multiple recipients with just a few clicks.
This approach not only saves time but also minimizes errors and keeps your inbox well-organized. Whether connecting with team members, friends, or family, group emails ensure efficient communication and help keep everyone informed and updated.
Take the first step in organizing your contacts today and enjoy the advantages of seamless group communication in Gmail.
FAQ about how to create a gmail group
How do I create a new Gmail group using Google Contacts?
To create a new Gmail group using Google Contacts, log into Gmail and open Google Contacts. Select the contacts you want, click the label icon, and choose “Create label.” Name your group and save it. The group label will appear in Contacts for easy emailing later.
Can I add or remove members from my Gmail group after it is created?
Yes, you can easily add or remove members from your Gmail group after creation. Access Google Contacts, click your group, then use the vertical ellipses menu next to each contact to remove them or manage labels.
To add members, click the group and add new email addresses as needed.
How do I send an email to all members of my Gmail group at once?
Open Gmail, click Compose, type your group’s name in the To field, select the group when it appears, write your message, and click Send. All group members will receive the email instantly.
What privacy settings can I configure when creating a Gmail group?
When creating a Gmail group, you can configure privacy settings to control who can view conversations, join the group, and post messages. You can restrict visibility to members only, limit posting rights to members, control who can search for the group, and decide whether external members can access it. Learn more about blocking unwanted email to protect your inbox.
And this was our article about how to create a gmail group. If you want to know more check our blog.