
If your iPhone’s inbox is overflowing with unwanted messages and you’re wondering how to delete emails on your iPhone, you’ve come to the right place. Whether you’re dealing with a cluttered mailbox or simply trying to manage your digital life more efficiently, deleting emails on your iPhone is a straightforward process that anyone can master. The Mail app offers several convenient ways to remove messages, from deleting a single email with a quick swipe to clearing out hundreds of emails at once using the select all feature.
In this step-by-step guide, we’ll walk you through all the methods you need to know to keep your inbox organized and your iPhone running smoothly. Managing your email account doesn’t have to be complicated. Whether you’re using Apple Mail, Gmail, or another email service, deleting emails is intuitive and user-friendly.
You can tap through your inbox to select specific emails, use the trash delete function to permanently remove messages, or adjust your settings to make email management work for you. By the end of this guide, you’ll have all the tools to maintain a clean and organized Mail app on your device.
If your iPhone is still running out of space after deleting emails, you may also need to clean up iCloud storage messages and free up space.
And if you’re looking for an easy way to delete emails on iPhone, Cleanfox can help you do it—all for free.
If you want to better understand what’s filling your inbox with unwanted messages, check our guide on whether junk email is the same as spam.
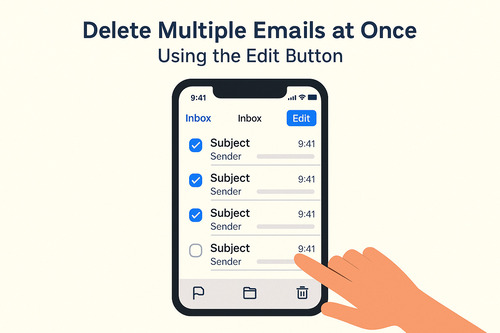
Delete Multiple Emails at Once

Say goodbye to spam, clutter, and chaos.
Our smart email cleaner filters out junk, organizes your inbox, and helps you focus on what really matters.
✅ Block spam automatically
✅ Organize emails by priority
✅ Keep your inbox clean
✅ Clean old emails you don’t read
📱 Available on the App Store and Google Play.

Using the Edit Button
Deleting multiple emails at once on your iPhone is simple when you use the Mail app’s built-in editing tools. First, open the Mail app and navigate to the inbox or folder where you want to remove emails.
Tap the Edit or Select button located in the top right corner of the screen. You can then tap the circles next to each email you want to delete. For a faster method, tap the first email and slide your finger down the list to quickly select multiple messages.
Once you’ve selected all the emails, tap the Trash icon at the bottom to delete them all at once. This method is efficient for managing batches of messages without having to delete them one by one.
Utilizing the “Shake to Undo” Feature
An often-underused feature on the iPhone for managing your emails is the Shake to Undo option. After deleting multiple messages or making any changes by mistake, simply give your iPhone a quick shake. This will prompt an option to undo the deletion, allowing you to recover mistakenly removed emails.
This feature adds an extra layer of control when you’re cleaning up your inbox, giving you confidence that you won’t lose important messages by accident. Just remember, the shake gesture must be enabled in your iPhone Settings under Accessibility for it to work.
Swipe to Delete and Other Ways to Discard One Email
Swipe to Delete
One of the quickest ways to delete an email on your iPhone is by using the swipe to delete gesture in the Mail app. Simply open your inbox, locate the email you want to remove, and swipe left across the message.
This action reveals a red Delete button—tap it to send the email directly to the trash folder. If you swipe all the way to the left without stopping, the email deletes immediately without requiring any additional taps.
However, depending on your email account settings, you might see Archive instead of delete as the default option. To change this, go to your iPhone’s Settings, select Mail, tap Accounts, choose the account, then select Account followed by Advanced. Under “Move Discarded Messages Into,” set it to Deleted Mailbox.
This ensures that swiping left deletes emails instead of archiving them, making inbox cleanup faster and more efficient.
Using More Actions
If you prefer not to swipe or want additional options for discarding an email, you can use the More Actions menu. From your inbox list, swipe left gently or tap and hold on an email to reveal a menu with options such as Reply, Flag, Move Message, and Delete. Selecting Delete from this menu sends the message to your trash folder.
This method allows you to review several actions for an email before removing it. It’s particularly useful when you need to perform multiple email management tasks without opening the message itself.
Delete Emails from a Specific Sender with Categories View in iOS 18.2
Sorting Emails by Sender
With iOS 18.2 and later, Apple started rolling out a Categories view in the Mail app, which can automatically sort emails into groups like Primary, Transactions, Updates, and Promotions. This feature isn’t available for all users or all email accounts yet, but when it appears, it helps organize messages by type and makes bulk deletion much easier.
When you tap into any category, such as Transactions or Promotions, you’ll see a digest view where emails from the same sender are grouped together. This makes it simple to focus on emails from one sender without hunting through your entire inbox. Additionally, you can manually categorize senders to direct future emails into a category you prefer, keeping your inbox organized and tailored to your needs.
Bulk Deletion in Categories View
Once your emails are sorted into these categories, deleting multiple emails from a specific sender becomes straightforward. Inside a category, open the grouped emails by a sender, then tap Select or the edit option at the top right to choose multiple messages at once. After selecting the emails you want to remove, tap Trash to delete them all simultaneously.
This bulk deletion capability in the Categories view allows you to clean out unwanted mail quickly without switching folders or searching manually. It’s particularly useful for managing promotional or update emails flooding your iPhone inbox since you can target whole groups by sender for efficient removal.
Set “Trash” or “Archive” as Your Default Swipe Option
Customizing Swipe Options
To enhance your email management experience on iPhone, you can customize the default swipe actions in the Mail app. Navigate to Settings, select Mail, and tap Swipe Options. This allows you to define what happens when you swipe left or right on an email message.
Options typically include Trash, Archive, Flag, Mark as Read, or Move Message. Once you’ve selected your preferred action for each swipe direction, return to the Mail app to test your new setup. This personalization helps you efficiently handle your most frequent email tasks using simple gestures, making inbox management faster and more streamlined.
Difference Between Trash and Archive
Knowing the distinction between Trash and Archive is important when setting your swipe default. Deleting an email sends it to the Trash folder, where it will eventually be permanently removed, ensuring it no longer clutters any mailbox folders.
Archiving, however, moves the email out of your inbox while keeping it in the archive folder, allowing you to retrieve it later if necessary. This option is perfect for messages you want to keep but don’t need to access regularly.
Your choice depends on whether you prefer to fully delete emails when swiping or simply move them out of sight while maintaining access. You can adjust this setting on a per-account basis, often under Accounts then Advanced within the Mail settings. This customization is particularly useful for accounts like Gmail, iCloud, and Exchange.
Conclusion
Deleting emails on your iPhone is simple and customizable. Whether you want to clear multiple messages at once or delete individual emails quickly using swipe gestures, the process is straightforward. Leveraging the Categories view in iOS 18.2 further enhances email management by grouping messages by sender, which makes bulk deletions much easier.
Don’t forget to set your preferred swipe action to either trash or archive for faster inbox control. By mastering these tools and settings in the Mail app, you can keep your inbox organized and clutter-free. Take a moment now to apply these tips and enjoy a cleaner, more efficient email experience on your iPhone.
FAQ
How do I delete a single email on my iPhone using the Mail app?
To delete a single email on your iPhone, open the Mail app, locate the email, swipe left on it, and then tap Trash. Alternatively, you can open the email, tap the folder icon at the bottom, and move it to Trash.
Can I delete multiple emails at once on my iPhone, and if so, how?
Yes, you can delete multiple emails simultaneously on your iPhone. Start by opening the Mail app and navigating to your Inbox. Tap “Select” in the top-right corner, then choose individual emails or swipe down to select multiple emails quickly.
Once selected, tap “Trash” to delete them. Alternatively, for bulk deletions, you can use your email provider’s website.
Why do deleted emails sometimes reappear on my iPhone after I delete them?
Deleted emails may reappear due to syncing issues between your device and the mail server, incorrect Mail app settings, or occasional glitches. This happens when the device fails to properly inform the server about the deletions, leaving emails on the server to be re-downloaded.
To resolve this, adjust your Mail app settings, re-sync the account, or ensure your software is updated.
How do I permanently delete emails from my iPhone so they are removed from both the device and the server?
To permanently delete emails from your iPhone and the server, delete the emails in the Mail app, then go to the Trash folder and delete them again for permanent removal. For iCloud accounts, you can turn off iCloud Mail and choose to delete mail data.
Make sure your email account uses IMAP or Exchange for proper server synchronization, not POP. Refresh the Mail app to ensure the deletions are updated across your devices and the server.
And this was our article on How to Delete Emails on iPhone. If you want to know more about emails check our blog.